⚡ Quick Answer
Can yoga poses help with diabetes? Yes. Gentle yoga poses can support blood sugar control by building muscle that uses glucose, improving insulin sensitivity, and reducing stress hormones that raise blood sugar. Yoga supports diabetes care but does not replace prescribed medicine. The safest starting poses include Tadasana, Vrikshasana, Setu Bandha, Balasana, and Viparita Karani, practiced with blood sugar checks and a doctor’s guidance.
If you live with type 2 diabetes, you have probably heard that exercise helps your blood sugar. What you may not have heard is which kind of movement suits your body, your energy, and your condition.
Yoga fits that gap well. Many yoga poses are gentle, weight-bearing, and easy to adjust. They build strength in the large muscles of the legs and hips, which are the body’s main consumers of glucose. They also calm the nervous system, which matters because chronic stress can push blood sugar upward.
This guide covers yoga poses for diabetes in detail. You will learn how yoga affects blood sugar, which eight poses are the most suitable starting points, how to modify them for neuropathy, retinopathy, and joint pain, and which poses to avoid. Each pose includes a step-by-step guide, safety notes, and modifications.
If you are ready to start, bookmark this page and share it with your doctor or diabetes educator. Practice with their input, and you will get far more from every session.
Myths About Yoga and Diabetes
Misinformation about yoga and diabetes spreads quickly online. Correcting these myths first will protect your health and set realistic expectations.
Myth 1: Yoga can cure type 2 diabetes. Yoga does not cure diabetes. It can improve blood sugar control and insulin sensitivity over time, and some people reduce their medication needs under medical supervision. Only a doctor should change diabetes medication.
Myth 2: Yoga can replace insulin or metformin. Yoga is a complement to medical treatment. Stopping or reducing prescribed medicine because of yoga can cause dangerous blood sugar swings.
Myth 3: Any yoga class is safe for people with diabetes. Hot yoga, intense power classes, and inversions can be unsafe for some people with diabetes, especially those with eye or nerve complications. Gentle, modified practice is the safer starting point.
Myth 4: One yoga session will fix high blood sugar. A single session may produce a small short-term drop in blood sugar, but meaningful changes in HbA1c usually take several weeks of consistent practice.
How Yoga Affects Blood Sugar
Yoga affects blood sugar through three main pathways: muscle activity, insulin sensitivity, and stress reduction.
Muscle activity uses glucose. When you hold poses like Warrior II or Bridge, large leg and glute muscles contract. Working muscles pull glucose from the bloodstream without needing as much insulin, which is why movement is one of the most useful tools for people managing blood sugar.
Regular practice may improve insulin sensitivity. Over weeks of consistent practice, the body may respond better to its own insulin. Research on yoga and glycemic control has reported modest improvements in HbA1c in several trials, though results vary and larger studies are still refining the picture.
Stress and cortisol influence blood sugar. Stress hormones such as cortisol raise blood sugar. Slow breathing and restorative poses lower the stress response, which can help steady glucose levels across the day.
Yoga vs. Walking for Blood Sugar
| Factor | Yoga | Brisk Walking |
|---|---|---|
| Muscle use | Moderate, full-body with balance work | High, mainly legs |
| Stress reduction | High, especially with breathwork | Moderate |
| Flexibility and balance | High | Low to moderate |
| Ease of adjusting for injuries | High | Moderate |
| Best role | Complement to walking, plus stress and balance | Primary aerobic activity |
The American Diabetes Association recommends regular physical activity that combines aerobic exercise, resistance work, and flexibility. Yoga covers the second and third categories well, so most people do best combining yoga with walking.
Safety First: Check With Your Doctor Before Starting
Before beginning any yoga routine for diabetes, speak with your doctor or diabetes care team, especially if you take insulin or sulfonylureas, which can cause low blood sugar.
Follow these safety steps:
- Check your blood sugar before practice. If you take insulin or medications that can cause lows, check before each session.
- Carry fast-acting glucose. Keep glucose tablets or juice nearby in case blood sugar drops during practice.
- Skip vigorous practice when blood sugar is very high. Guidance from diabetes organizations generally advises against strenuous exercise when glucose is above 250 mg/dL with ketones present. Check with your doctor for your personal thresholds.
- Inspect your feet daily. Numbness from neuropathy can hide injuries, so check feet before and after practice.
- Stop if you feel dizzy, shaky, sweaty, or confused. These can be signs of low blood sugar.
Step-by-Step Guide: 8 Yoga Poses for Diabetes
Each pose below is gentle enough for most beginners and includes a modification. Practice slowly, breathe continuously, and stop if you feel pain.
1. Tadasana (Mountain Pose)
Tadasana builds postural awareness and gently engages the legs, which supports blood flow and balance.
Steps:
- Stand with feet hip-width apart, weight evenly spread across all four corners of each foot.
- Engage your thighs lightly and lengthen your spine from the tailbone to the crown of the head.
- Relax your shoulders down and back, arms resting at your sides.
- Breathe slowly for 5 to 10 breaths, feeling your feet connect with the floor.
Modification: Hold a chair or wall for support if standing feels unsteady.
2. Vrikshasana (Tree Pose)
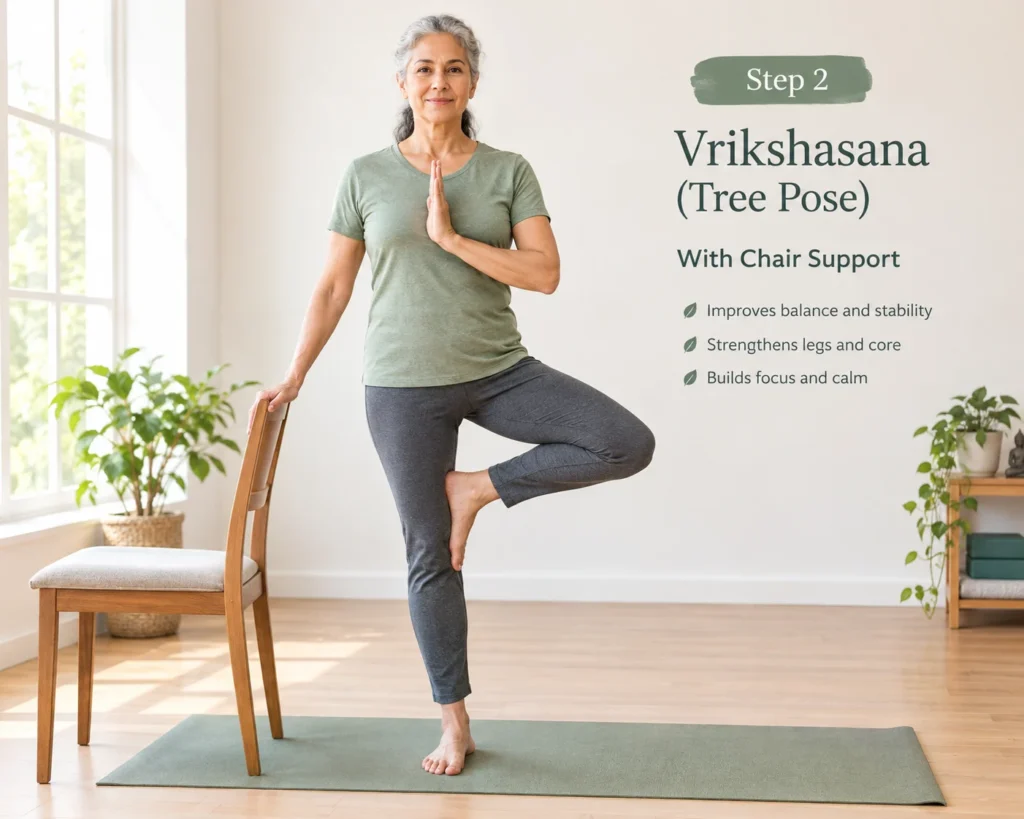
Tree Pose strengthens the standing leg and improves balance, which helps reduce fall risk common in people with neuropathy.
Steps:
- Stand tall in Tadasana, then shift weight onto your left foot.
- Place the sole of your right foot on your left calf or inner thigh. Avoid the knee joint.
- Bring palms together at the chest or raise arms overhead.
- Hold 20 to 30 seconds, then switch sides.
Modification: Keep one hand on a wall or chair back. Place the foot lower on the calf if balance is limited.
3. Virabhadrasana II (Warrior II)
Warrior II engages the thighs, glutes, and core. Large leg muscles are strong glucose users, so this pose contributes directly to blood sugar management.
Steps:
- Stand with feet wide apart, about 3 to 4 feet.
- Turn your right foot out 90 degrees and your left foot slightly in.
- Bend your right knee over the right ankle, keeping the knee in line with the second toe.
- Extend arms out to the sides at shoulder height, gaze over your right hand.
- Hold 20 to 30 seconds, breathing steadily. Switch sides.
Modification: Keep the stance shorter and the knee bend shallower if hips or knees feel tight.
4. Setu Bandha Sarvangasana (Bridge Pose)
Bridge Pose activates the glutes and hamstrings and gently stretches the chest and hip flexors. Because the head stays on the ground, it is a gentler option than full inversions.
Steps:
- Lie on your back with knees bent and feet flat, hip-width apart.
- Press through your feet and lift your hips toward the ceiling.
- Keep your shoulders grounded and your neck relaxed.
- Hold 15 to 30 seconds, then lower slowly, one vertebra at a time.
Modification: Place a yoga block or folded blanket under the sacrum for support, and keep the lift small.
5. Bhujangasana (Cobra Pose)
Cobra Pose gently opens the chest and strengthens the back. It counters the forward posture many people develop from desk work and screen time.
Steps:
- Lie face down with palms beside your shoulders, elbows close to your body.
- Press the tops of your feet into the floor and lift your chest slightly.
- Keep your lower ribs on the mat and your neck long.
- Hold 10 to 20 seconds, then rest in Balasana.
Modification: Keep the arms bent and the lift small. Avoid this pose if you have a back injury without medical clearance.
6. Ardha Matsyendrasana (Seated Half Spinal Twist)
The seated twist supports spinal mobility and gentle abdominal engagement. Many practitioners find it helpful after meals, though timing should follow your doctor’s advice.
Steps:
- Sit tall with legs extended in front of you.
- Bend your right knee and place the right foot outside the left thigh.
- Hook your left elbow outside the right knee, and place the right hand behind you.
- Inhale to lengthen the spine, exhale to twist gently to the right.
- Hold 5 breaths, then switch sides.
Modification: Keep the twist shallow and sit on a folded blanket if the hips feel tight.
7. Paschimottanasana (Seated Forward Fold, Modified)
Seated forward folds stretch the hamstrings and calm the nervous system. Use a modified version to avoid straining the lower back.
Steps:
- Sit with legs extended and a folded blanket under the sit bones.
- Bend the knees slightly, keeping a soft angle behind them.
- Hinge forward from the hips, leading with the chest, not the head.
- Rest the hands on the shins or a strap around the feet.
- Hold 30 to 60 seconds, breathing slowly.
Important: Avoid this pose if you have glaucoma or retinopathy, because head-below-heart positions can raise eye pressure. See the Contraindications section.
8. Viparita Karani (Legs Up the Wall)
Legs Up the Wall is a restorative pose that encourages venous return from the legs. It is especially helpful for people with swollen feet or heavy legs.
Steps:
- Sit sideways against a wall, then slowly swing your legs up the wall as you lie back.
- Keep hips close to the wall, arms relaxed beside the body.
- Breathe slowly for 3 to 5 minutes.
- Release by bending the knees and rolling to one side before sitting up.
Modification: Place a folded blanket under the hips for comfort. Keep the legs bent if the hamstrings are tight.
Breathwork for Blood Sugar
Breathwork supports the stress-reduction pathway, and it requires no equipment.
Dirgha Pranayama (Three-Part Breath)
Three-part breath slows the breathing rate and encourages the relaxation response. Practice for 3 to 5 minutes.
- Sit comfortably and place one hand on the belly and one on the ribs.
- Inhale slowly and let the belly, then the ribs, then the upper chest expand.
- Exhale in reverse, letting the chest, ribs, and belly soften.
Nadi Shodhana (Alternate Nostril Breathing)
Alternate nostril breathing is a calming practice when done gently. Keep it smooth and avoid breath holding.
- Use the right thumb to close the right nostril and inhale through the left.
- Close the left nostril with the ring finger, release the thumb, and exhale through the right.
- Inhale through the right, then exhale through the left. Continue for 2 to 5 minutes.
Caution: Skip breath retention (kumbhaka) and forceful breathing such as Bhastrika if you have diabetes complications, high blood pressure, or heart concerns.
Modifications for Different Bodies
Every body responds differently. These modifications help adapt the poses above.
For diabetic neuropathy (numb or tingling feet): Practice standing poses near a wall or chair. Choose supportive shoes or practice barefoot only on a safe, clean surface after checking your feet. Avoid pressing hard onto numb areas.
For diabetic retinopathy or eye pressure concerns: Skip inversions such as Sarvangasana (shoulder stand) and Sirsasana (headstand). Avoid deep forward folds where the head drops below the heart. Use Bridge and Legs Up the Wall instead.
For knee pain or arthritis: Reduce the depth of Warrior II and Tree Pose. Use a chair for support in all standing poses, and skip kneeling poses that load the knee.
For high blood pressure: Avoid breath holding and inversions. Choose slow, steady breathing and keep the lift in Bridge Pose modest.
For limited mobility or older adults: Use a chair for seated versions of Tree, Warrior II, and Mountain Pose. Practice Legs Up the Wall with a bolster or blankets for support.
For fatigue or low energy days: Shorten the session to Tadasana, Bridge, and Legs Up the Wall. A 10-minute practice still counts.
For pregnancy with gestational diabetes: Consult your obstetric care team. Choose prenatal yoga classes, avoid lying flat on the back after the first trimester, and skip any pose that involves deep twisting or abdominal pressure.
Common Mistakes (and How to Fix Them)
Mistake 1: Practicing on an empty stomach while on insulin. The fix: Check blood sugar first and keep a fast-acting snack nearby. Ask your doctor how to adjust insulin or food timing around practice.
Mistake 2: Pushing through foot pain or numbness. The fix: Stop when you feel pain, and inspect your feet afterward. Numbness can hide blisters and wounds, so check them every day.
Mistake 3: Holding the breath during strong poses. The fix: Keep the breath continuous and steady. Breath holding can raise blood pressure and stress the body.
Mistake 4: Expecting fast blood sugar results from one class. The fix: Track readings across several weeks. Meaningful HbA1c changes usually take consistent practice over months, not days.
Mistake 5: Stopping prescribed medication because yoga feels helpful. The fix: Keep taking medication as prescribed. Share any changes in how you feel with your doctor, who can adjust treatment safely.
When to Practice
Best overall timing: Choose the time of day you can keep consistently. Consistency matters more than the exact hour.
Around meals: A short walk after meals is widely recommended for blood sugar. Gentle poses such as the seated twist and Legs Up the Wall can be added after eating, but wait for your doctor’s guidance on timing if you take insulin.
Morning practice: Morning sessions can set a calm, steady tone for the day. Check blood sugar before practice if you take medications that can cause lows.
Evening practice: A restorative session before bed can support relaxation. Keep it gentle to avoid overstimulation.
Weekly routine: Aim for 3 to 5 sessions per week, 15 to 30 minutes each, combined with regular walking. Add one longer session on weekends if time allows.
Contraindications: When to Modify or Avoid
Avoid or modify the following if you have these conditions:
- Diabetic retinopathy or glaucoma: Avoid inversions, deep forward folds, and vigorous breath holding. Discuss all new practices with your eye doctor.
- Severe or unstable neuropathy: Avoid barefoot balance work on uneven ground. Use a chair or wall for support.
- Recent foot ulcers or infections: Skip standing poses that place pressure on the affected area until your foot doctor clears you.
- Low blood sugar (hypoglycemia): Eat or drink fast-acting carbohydrates before continuing. Do not practice until your blood sugar is stable.
- Blood sugar above 250 mg/dL with ketones: Skip vigorous practice and contact your doctor.
- Heart disease or uncontrolled high blood pressure: Avoid inversions and forceful breathing. Use gentle restorative practice only with medical clearance.
FAQ Section
Q1. Can yoga lower blood sugar?
Yoga can support blood sugar control by building muscle activity, improving insulin sensitivity over time, and reducing stress. Effects vary by person, and yoga does not replace prescribed diabetes medication.
Q2. How long does it take for yoga to affect blood sugar?
A single session may produce a short-term change. Measurable changes in HbA1c usually take several weeks to months of consistent practice, 3 to 5 times per week.
Q3. Which yoga poses are best for type 2 diabetes?
Tadasana, Vrikshasana, Virabhadrasana II, Setu Bandha Sarvangasana, and Viparita Karani are common starting points. They build leg strength, balance, and relaxation with minimal risk when modified properly.
Q4. Should I check blood sugar before yoga?
Yes, especially if you take insulin or sulfonylureas. Checking before practice helps you avoid low blood sugar and decide whether vigorous practice is safe that day.
Q5. Is yoga safe with diabetic neuropathy?
Yes, with precautions. Practice near a wall or chair, inspect your feet daily, and avoid barefoot balance work on uneven surfaces. Talk to your doctor about your specific neuropathy symptoms.
Key Takeaways
- Yoga supports blood sugar control but does not replace prescribed diabetes medication.
- Working leg and glute muscles use glucose, which makes standing and bridge poses especially useful.
- Regular practice may improve insulin sensitivity over several weeks.
- Stress reduction through breathwork and restorative poses can help steady blood sugar.
- Check blood sugar before practice if you take insulin or sulfonylureas.
- Carry fast-acting glucose during every session.
- Inspect your feet daily if you have neuropathy, and practice near a wall or chair.
- Avoid inversions and deep head-below-heart folds if you have retinopathy or glaucoma.
- Skip vigorous practice when blood sugar is very high, especially with ketones.
- Start with Tadasana, Vrikshasana, Setu Bandha, Balasana, and Viparita Karani.
- Combine yoga with regular walking for the best overall results.
- Track your readings and share progress with your doctor.
Conclusion
Yoga will not fix diabetes on its own, and it should never replace the medicine, monitoring, and medical care your doctor prescribes. What it can do is give you a steady, enjoyable way to move your body, build strength in the muscles that use glucose, and calm the stress that pushes blood sugar up. The poses in this guide are a practical starting point, and each one comes with a modification so you can practice at your own level.
Start small. Choose three poses, practice them for ten minutes, three times this week, and check your blood sugar before and after your sessions. Note how your body responds, including energy, sleep, and readings. Bring that log to your next appointment so your care team can see the full picture.
Pay attention to your feet, your eyes, and the warning signs of low blood sugar. If something feels wrong, stop and reach out to your doctor. Yoga works best when it is part of a complete plan that includes healthy food, regular walking, good sleep, and medical follow-up.