

⚡ Quick Answer Box
The best basic yoga poses for beginners include Mountain Pose, Child’s Pose, Downward Facing Dog, Cat-Cow, Warrior Pose 1, Seated Forward Fold, Bridge Pose, and Corpse Pose. These foundational poses build strength, flexibility, and body awareness safely. Most beginners can start practicing these poses in their very first session — no prior experience needed.
Starting yoga can feel overwhelming — hundreds of pose names, different styles, and no idea where to begin.
Here’s the truth: you don’t need to know hundreds of poses to get real results from yoga. A handful of well-practiced basic yoga poses can transform your flexibility, reduce stress, strengthen your body, and bring genuine calm to your mind.
This guide is your starting point. Whether you’re stepping onto a yoga mat for the very first time or returning after a long break, we’ve broken down the most important basic yoga poses in simple, clear language — with step-by-step instructions, alignment tips, benefits, and safety guidance for every single pose.
By the end of this guide, you’ll have everything you need to start a confident, safe, and sustainable yoga practice — right from your own home.
What Are Basic Yoga Poses?
Basic yoga poses — also called foundational poses — are postures specifically suited to beginners. They are:
- Safe and accessible for most bodies, regardless of age or fitness level
- Fundamental building blocks that more advanced poses are built upon
- Effective on their own — you don’t need to progress further to get results
In yoga, basic does not mean easy. Many foundational poses challenge experienced practitioners every single day. The simplicity is in the approach — these poses can be entered gently, modified freely, and practiced without special equipment.
| What You Need | Details |
|---|---|
| Equipment | A yoga mat (non-slip) |
| Space | Enough to extend your arms fully |
| Clothing | Comfortable, stretchy clothes |
| Time | 20–30 minutes per session |
| Experience | Zero — complete beginners welcome |
How to Prepare Before You Start
Before jumping into the poses, a few simple things will make your practice safer and more effective:
1. Warm Up First Never jump straight into deep stretches. Start with 5 minutes of gentle movement — slow neck rolls, shoulder circles, and Cat-Cow pose (covered below).
2. Breathe Through Everything In yoga, breath is the foundation. Inhale through the nose, exhale through the nose. Never hold your breath. If a pose makes breathing difficult, ease back.
3. Honor Your Body Discomfort from a stretch is normal. Pain is not. The moment you feel sharp or sudden pain, come out of the pose immediately.
4. Use Props Freely Yoga blocks, straps, and folded blankets are not signs of weakness — they are tools used by practitioners of all levels to practice with better alignment.
5. Practice Barefoot Bare feet give you better grip and allow your toes to spread, which improves balance and stability in every standing pose.
12 Essential Basic Yoga Poses for Beginners
1. Mountain Pose (Tadasana)
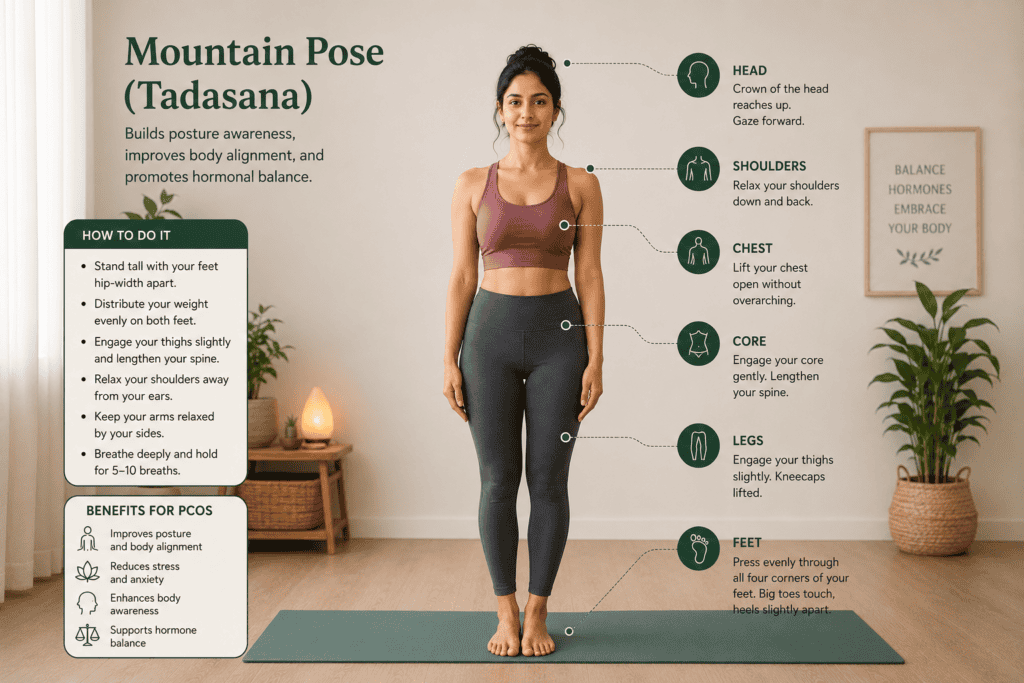
Why it matters: Mountain Pose is the foundation of all standing yoga poses. It looks simple but teaches the most important principles in yoga — alignment, grounding, and active stillness.
How to do it:
- Stand at the top of your mat with feet together or hip-width apart
- Press all four corners of each foot into the mat
- Engage your thigh muscles gently — don’t lock your knees
- Lengthen your spine from your tailbone to the crown of your head
- Roll your shoulders back and down, arms resting by your sides
- Breathe deeply and hold for 5–8 breaths
Key alignment cue: Imagine a straight line running from the top of your head down through your spine, hips, knees, and ankles.
Benefits: Improves posture, builds body awareness, strengthens ankles and thighs, grounds the nervous system.(1)
Modification: Stand with feet hip-width apart if you feel unsteady.
2. Child’s Pose (Balasana)
Why it matters: Child’s Pose is yoga’s universal resting pose. You can return to it anytime during practice when you need to rest, reset, or breathe.
How to do it:
- Start on your hands and knees (tabletop position)
- Bring your big toes together and widen your knees to the edges of your mat
- Exhale and sit your hips back toward your heels
- Extend your arms forward on the mat, forehead resting down
- Breathe deeply into your back body — feel your ribcage expand with each inhale
- Hold for 8–10 slow breaths
Key alignment cue: Let gravity do the work — don’t actively push or force anything. Simply surrender the weight of your body downward.
Benefits: Releases lower back, hips, and shoulders. Deeply calms the nervous system. Relieves mild anxiety and fatigue.
Modification: Place a folded blanket between your thighs and calves if your hips don’t reach your heels comfortably.
3. Cat-Cow Pose (Marjaryasana-Bitilasana)
Why it matters: Cat-Cow is the perfect warm-up for the spine and one of the best poses for beginners. It synchronizes breath with movement — the core skill of yoga practice.
How to do it:
- Start in tabletop position — hands under shoulders, knees under hips
- Cow: Inhale, drop your belly toward the mat, lift your chest and tailbone, gaze gently upward
- Cat: Exhale, round your spine toward the ceiling, tuck your chin to chest, draw your belly in
- Flow between Cow on the inhale and Cat on the exhale
- Repeat for 8–10 breath cycles, moving slowly
Key alignment cue: Keep your wrists directly under your shoulders and knees directly under your hips throughout.
Benefits: Warms up the spine, improves spinal flexibility, massages the digestive organs, relieves mild back stiffness, establishes breath-movement connection.
Modification: If wrists are sensitive, lower to your forearms (sphinx position) and do the same spinal movements.
4. Downward Facing Dog (Adho Mukha Svanasana)
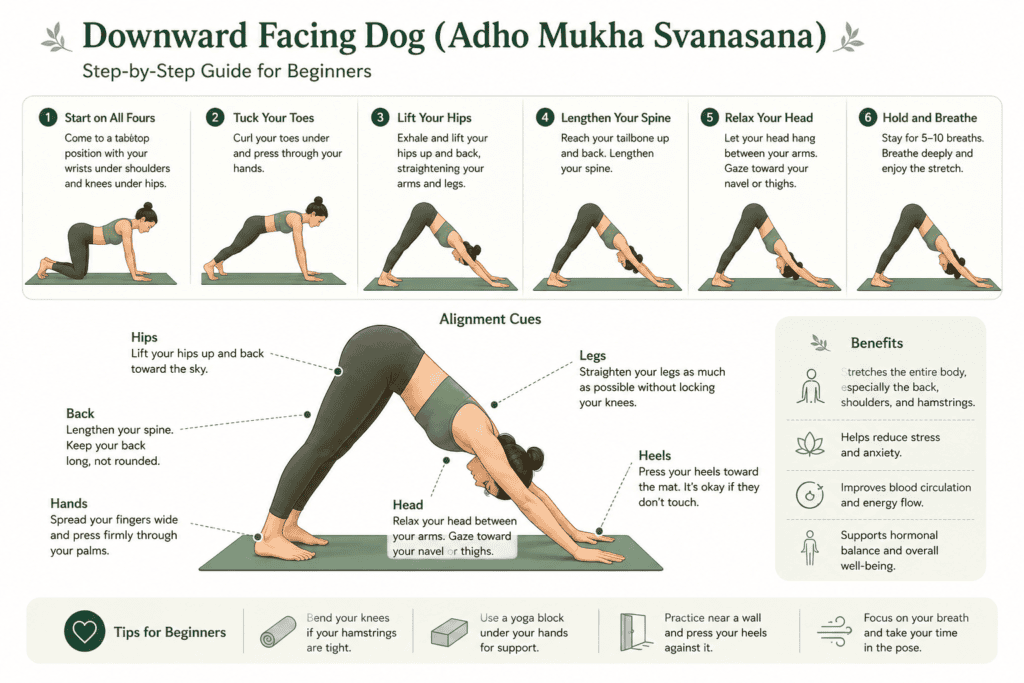
Why it matters: Downward Dog is one of the most recognized yoga poses in the world — and for good reason. It is a full-body pose that stretches and strengthens simultaneously.
How to do it:
- Start in tabletop position
- Tuck your toes and press through your hands to lift your hips up and back
- Your body forms an inverted V-shape
- Keep your knees slightly bent if your hamstrings are tight
- Press firmly through all ten fingers — especially the index finger and thumb
- Let your head hang naturally, ears in line with your upper arms
- Hold for 5–8 breaths
Key alignment cue: Focus on lengthening your spine first — a long spine with bent knees is better than straight legs with a rounded back.
Benefits: Stretches hamstrings, calves, and spine. Strengthens arms, shoulders, and core. Improves circulation (mild inversion). Energizes and calms simultaneously.
Modification: Keep knees generously bent. Use a chair with hands on the seat for a gentler version.
5. Warrior Pose 1 (Virabhadrasana I)
Why it matters: Warrior Pose 1 is the first true strength-building pose most beginners encounter. It develops leg strength, hip flexibility, and mental focus all at once.
How to do it:
- From Mountain Pose, step your left foot back 3.5–4 feet
- Turn your left foot out at 45°
- Square both hips to face the front of your mat
- Bend your right knee to 90°, stacking it over your right ankle
- Inhale and sweep both arms overhead, palms facing each other
- Lift your chest, keep shoulders relaxed away from ears
- Hold for 5–8 breaths, then switch sides
Key alignment cue: The most important cue in this pose is squaring your hips forward. Draw your back hip toward the front and your front hip slightly back.
Benefits: Strengthens legs, glutes, and core. Opens chest and hip flexors. Builds stamina, confidence, and mental focus.
Modification: Shorten your stance if your hips feel very tight. Keep hands on hips if raising arms is uncomfortable for your shoulders.
📖 Want to go deeper? Read our complete guide: Warrior Pose 1 (Virabhadrasana 1): Steps, Benefits & Precautions
6. Warrior Pose 2 (Virabhadrasana II)
Why it matters: Warrior 2 is a natural progression from Warrior 1 and one of the most powerful hip-opening standing poses available to beginners.
How to do it:
- From Mountain Pose, step your feet wide (about 4 feet apart)
- Turn your right foot out 90°, left foot in slightly
- Bend your right knee over your right ankle — thigh toward parallel
- Open your arms to a T-shape — right arm forward, left arm back
- Gaze over your right middle finger
- Keep your torso upright, hips open to the side
- Hold for 5–8 breaths, then switch sides
Key alignment cue: Unlike Warrior 1, your hips are open to the side in Warrior 2 — not squared forward. Think of your hips like headlights pointing to the long edge of the mat.
Benefits: Tones thighs and glutes, opens hips laterally, improves endurance and concentration, strengthens ankles.
Modification: Raise your front thigh higher (less bend) if the full 90° is too intense on the knee.
7. Triangle Pose (Trikonasana)
Why it matters: Triangle Pose is a cornerstone of most yoga styles. It stretches the entire side body, strengthens the legs, and improves spinal mobility.
How to do it:
- Stand with feet wide, right foot facing forward, left foot turned in slightly
- Extend arms to a T-shape
- Hinge at your right hip and extend your torso to the right
- Lower your right hand to your shin, ankle, or a yoga block
- Reach your left arm straight up toward the ceiling
- Open your chest toward the ceiling, gaze up at your top hand (or forward if neck is sensitive)
- Hold for 5–8 breaths, then switch sides
Key alignment cue: Keep both legs straight and strong. Don’t let your front knee bend. The pose is about side-body length, not how low your hand goes.
Benefits: Stretches hamstrings, IT band, and spine. Strengthens legs and core. Improves balance and body awareness.
Modification: Use a yoga block under your bottom hand. Keep your gaze forward rather than upward if you have neck issues.
8. Tree Pose (Vrksasana)
Why it matters: Tree Pose introduces single-leg balance to beginners. It builds ankle strength, focus, and the mental stillness that is central to yoga practice.
How to do it:
- Stand in Mountain Pose
- Shift your weight onto your right foot
- Place the sole of your left foot on your right calf or inner thigh (never on the knee)
- Bring hands to heart center (prayer position) or raise them overhead
- Find a fixed point to gaze at — this helps enormously with balance
- Hold for 5–8 breaths, then switch sides
Key alignment cue: Press your raised foot into your standing leg and your standing leg back into your foot — this mutual pressure creates stability.
Benefits: Builds single-leg balance, strengthens ankles and core, improves concentration and mental calm.
Modification: Keep your toes on the floor with heel resting on your ankle (kickstand position). Practice near a wall for support.
9. Seated Forward Fold (Paschimottanasana)
Why it matters: Seated Forward Fold is one of the most important seated poses in yoga. It deeply stretches the entire back body and teaches the vital concept of hinging from the hips — not rounding from the back.
How to do it:
- Sit on your mat with legs extended straight in front of you
- Flex your feet — toes point toward the ceiling
- Sit tall and lengthen your spine on an inhale
- On the exhale, hinge forward from your hips (not your waist)
- Reach for your feet, ankles, or shins — or use a strap
- Keep your spine as long as possible
- Hold for 8–10 slow breaths
Key alignment cue: Think “chest toward toes” not “head toward knees.” Leading with your chest keeps the spine long and the stretch where it should be — in the hamstrings and lower back.
Benefits: Deep hamstring and spine stretch. Calms the nervous system. Aids digestion. Relieves mild anxiety and fatigue.
Modification: Sit on a folded blanket if your hamstrings are very tight. Bend your knees generously and use a strap around your feet.
10. Bridge Pose (Setu Bandha Sarvangasana)
Why it matters: Bridge Pose is a gentle backbend that strengthens the posterior chain — glutes, hamstrings, and lower back — while opening the chest and hip flexors.
How to do it:
- Lie on your back with knees bent, feet flat on the mat hip-width apart
- Place your feet close enough that your fingertips can just brush your heels
- Press your feet firmly into the mat
- Inhale and lift your hips toward the ceiling
- Interlace your fingers under your back and roll your shoulders together
- Hold for 5–8 breaths, then slowly lower your spine back down vertebra by vertebra
Key alignment cue: Keep your knees tracking over your second toes — don’t let them fall in or out. Engage your glutes and core to hold the lift.
Benefits: Strengthens glutes, hamstrings, and lower back. Opens chest and hip flexors. Stimulates thyroid and digestion. Relieves mild back pain.
Modification: Place a yoga block under your sacrum for a supported, passive version. This is excellent for relaxation and lower back relief.
11. Legs Up the Wall (Viparita Karani)
Why it matters: This gentle inversion is one of the most restorative poses in yoga. It requires zero flexibility and delivers powerful benefits for the entire body and nervous system.
How to do it:
- Sit sideways next to a wall
- Swing your legs up the wall as you lower your back to the floor
- Your body forms an L-shape — hips close to the wall, legs extended up
- Rest your arms by your sides, palms facing up
- Close your eyes and breathe naturally
- Hold for 2–5 minutes
Key alignment cue: Your hips don’t need to touch the wall perfectly. Find a comfortable distance where your lower back feels supported by the floor.
Benefits: Reduces swelling and fatigue in the legs. Calms the nervous system instantly. Aids lymphatic flow. Lowers cortisol. Excellent for insomnia and anxiety.
Modification: Place a folded blanket under your hips for extra support and elevation.
12. Corpse Pose (Savasana)
Why it matters: Savasana is the most important pose in yoga — and the one most beginners skip. It is during Savasana that the nervous system integrates everything from your practice. Never end without it.
How to do it:
- Lie flat on your back
- Let your feet fall open naturally
- Place your arms slightly away from your body, palms facing up
- Close your eyes
- Release every muscle — let the mat completely support your weight
- Breathe naturally and allow your mind to settle
- Stay for a minimum of 5 minutes — ideally 10
Key alignment cue: The only instruction in Savasana is to do nothing. This is harder than it sounds — and that is exactly the practice.
Benefits: Integrates the entire yoga session. Reduces cortisol and blood pressure. Promotes deep rest and nervous system recovery. Reduces anxiety and improves sleep quality.
Modification: Place a bolster under your knees for lower back comfort. Use an eye pillow to deepen relaxation.
Beginner Yoga Sequence: Your First 30-Minute Practice
Here is a simple sequence using all 12 poses above. Practice this 3–4 times per week:
| # | Pose | Hold Time | Purpose |
|---|---|---|---|
| 1 | Mountain Pose | 8 breaths | Ground and centre |
| 2 | Cat-Cow | 10 cycles | Warm up the spine |
| 3 | Downward Dog | 5 breaths | Full body awakening |
| 4 | Child’s Pose | 8 breaths | Rest and reset |
| 5 | Warrior Pose 1 | 6 breaths each side | Build strength |
| 6 | Warrior Pose 2 | 6 breaths each side | Open hips |
| 7 | Triangle Pose | 6 breaths each side | Side body stretch |
| 8 | Tree Pose | 6 breaths each side | Balance and focus |
| 9 | Seated Forward Fold | 10 breaths | Deep hamstring stretch |
| 10 | Bridge Pose | 6 breaths × 2 | Strengthen posterior chain |
| 11 | Legs Up the Wall | 3 minutes | Restore and recover |
| 12 | Corpse Pose (Savasana) | 5–10 minutes | Integrate the practice |
Common Mistakes Beginners Make (And How to Avoid Them)
❌ Skipping the warm-up Cold muscles and connective tissue are more prone to injury. Always start with 5 minutes of gentle movement before deeper poses.
❌ Holding the breath This is the most common beginner mistake. If you notice you’re holding your breath, the pose is too intense — ease back until breathing flows freely.
❌ Forcing flexibility Yoga flexibility develops over weeks and months — not in one session. Forcing a deeper stretch creates micro-tears in muscle tissue and sets back your progress.
❌ Skipping Savasana Savasana is not optional. It is when the nervous system consolidates the benefits of your practice. Even 5 minutes makes a significant difference.
❌ Comparing yourself to others Every body is different. Every yoga journey is different. The only body you are working with is yours — and it is enough exactly as it is.
How Often Should Beginners Practice Yoga?
Minimum: 2 sessions per week — enough to build familiarity and see early flexibility gains.
Ideal: 3–4 sessions per week — this is where real transformation happens in strength, flexibility, and mental calm.
Daily practice: Absolutely possible once your body adapts. Even 15–20 minutes daily delivers significant results.
Start with 2–3 sessions per week for your first month. Listen to your body. Build gradually. Consistency always beats intensity.
What to Expect in Your First Month of Yoga
Week 1–2: Poses feel unfamiliar and some muscles will be sore (especially hamstrings, hips, and shoulders). This is normal.
Week 3–4: Alignment starts to click. Breathing becomes more natural in poses. You begin to notice small flexibility improvements.
Month 2 onward: Posture improves noticeably. Sleep quality often improves. Stress response becomes calmer. The practice starts to feel natural and enjoyable.
Benefits of Yoga
- Improved Flexibilit: One of the most noticeable benefits of yoga is increased flexibility. Regular practice helps you stretch and lengthen your muscles, making you more limber over time.
- Stress Reduction: Yoga is renowned for its stress-relieving abilities. Deep breathing and mindfulness techniques help calm the mind and reduce anxiety.
- Strength Building: Although yoga may appear to be gentle, it can actually provide a rigorous workout. Numerous poses necessitate bearing the weight of your body, which aids in the development of muscular strength.
- Better Posture: Yoga improves posture by strengthening the core and back muscles, which can help reduce back pain and enhance overall alignment.
- Mental Clarity: The emphasis on breath and meditation in yoga can enhance mental clarity and concentration, resulting in heightened alertness and focus.
Conclusion
Every experienced yogi — no matter how advanced — started exactly where you are right now.
The basic yoga poses in this guide are not just starting points. They are lifelong companions. Mountain Pose teaches you presence. Child’s Pose teaches you to rest without guilt. Warrior Pose teaches you strength and courage. Savasana teaches you to let go.
You don’t need to be flexible to start yoga. You don’t need special equipment, perfect balance, or a gym membership. You need a mat, a willingness to breathe, and the patience to show up for yourself — again and again.
Start with one pose today. Add another tomorrow. Build a sequence next week. In one month, you’ll be surprised by how far you’ve come.
Your yoga journey starts with one breath. Take it.
Start practicing today — visit TheShivYoga.com for guided beginner classes, weekly pose breakdowns, and a welcoming community that grows with you.
Disclaimer: This article is for informational purposes only and does not constitute medical advice. Always consult a qualified healthcare provider before beginning any new exercise or yoga program, particularly if you have pre-existing health conditions or injuries.
Key Takeaways
- 12 basic yoga poses are all you need to build a complete, effective beginner practice.
- The most important poses to master first are Mountain Pose, Child’s Pose, Cat-Cow, and Downward Dog — they appear in almost every yoga class.
- Breath always comes first — if you’re holding your breath, you’ve gone too far in a pose.
- Practice 3–4 times per week for 4–8 weeks to see meaningful results in flexibility, strength, and mental calm.
- Never skip Savasana — it is where the real benefits of yoga are integrated.
- Use modifications freely — blocks, straps, and bent knees are tools, not signs of weakness.
- Results come from consistency, not intensity — short regular practice beats occasional long sessions every time.
FAQ Section
Q1: How long does it take to see results from basic yoga poses?
Most beginners notice improved flexibility within 2–3 weeks of consistent practice (3–4 sessions per week). Stress reduction and better sleep quality are often felt within the first week. Significant strength and postural improvements typically appear within 4–8 weeks of regular practice.
Q2: Can I do basic yoga poses every day as a beginner?
Yes — many of the foundational poses listed here (Child’s Pose, Cat-Cow, Legs Up the Wall, Savasana) are gentle enough for daily practice. For stronger poses like Warrior 1 and 2, start with 3–4 sessions per week and add more as your body adapts.
Q3: Do I need a yoga mat for basic yoga poses?
A non-slip yoga mat is highly recommended for safety, comfort, and grip — especially for standing and balance poses. If you don’t have one yet, a thick carpet or exercise mat can work temporarily. Avoid practicing on bare wood floors without grip.
Q4: What should a complete beginner focus on first in yoga?
Focus on three things first: breathing (never hold your breath), alignment (use the cues in each pose), and consistency (practice 3 times per week even if sessions are short). Flexibility and strength will follow naturally. Don’t worry about how deep you go into a pose — how you breathe in it matters far more.
Q5: Are basic yoga poses safe for people with back pain?
Many basic yoga poses — including Cat-Cow, Child’s Pose, Bridge Pose, and Legs Up the Wall — are commonly recommended for mild back pain relief. However, if you have an acute back injury, herniated disc, or chronic back condition, always consult a physiotherapist or your doctor before starting yoga. A qualified yoga teacher can also provide personalized modifications.

