⚡ Quick Answer: What Are Hard Yoga Poses? Hard yoga poses (also called advanced or difficult yoga asanas) are postures that require a combination of strength, flexibility, balance, and body awareness that most practitioners take months or even years to develop. Poses like Scorpion (Vrischikasana), Eight-Angle Pose (Astavakrasana), and Handstand (Adho Mukha Vrksasana) sit at the top of the difficulty scale. They are NOT for beginners without proper preparation — but with consistent practice and good guidance, many of these hard yoga poses are absolutely achievable.
Let’s be honest — when most people step onto a yoga mat for the first time, they’re not thinking about handstands or backbends that look like they belong in a circus. But give it six months. A year. And suddenly that weird arm-balance pose you saw on Instagram starts looking… possible.
Hard yoga poses have a way of humbling even the most experienced practitioners. There’s always a next level, a deeper expression, a pose that asks more of your body and mind than you thought you had. That’s part of what makes yoga so endlessly fascinating.
In this guide, we’ve ranked 15 of the most hard yoga poses by challenge level — covering strength demands, flexibility requirements, and how long most dedicated practitioners take to achieve them. Whether you’re an intermediate yogi eyeing your first headstand or an advanced practitioner working toward Scorpion pose, this breakdown will help you understand what each pose actually requires — and how to get there safely.
We’ve also included beginner-friendly modifications for each pose, because the goal isn’t to show off. It’s to grow.
At a Glance: 15 Hard Yoga Poses Ranked by Difficulty
| Pose Name | Sanskrit Name | Difficulty | Best For |
| Scorpion Pose | Vrischikasana | ★★★★★ Expert | Backbend + Balance |
| Eight-Angle Pose | Astavakrasana | ★★★★★ Expert | Core + Arm Strength |
| Handstand | Adho Mukha Vrksasana | ★★★★☆ Advanced | Full Body Strength |
| One-Legged King Pigeon | Eka Pada Rajakapotasana | ★★★★☆ Advanced | Deep Hip + Back Flexibility |
| Peacock Pose | Mayurasana | ★★★★☆ Advanced | Core + Wrist Strength |
| Firefly Pose | Tittibhasana | ★★★★☆ Advanced | Hamstrings + Arms |
| Headstand | Sirsasana | ★★★☆☆ Intermediate+ | Core + Shoulder Stability |
| Crow Pose | Bakasana | ★★★☆☆ Intermediate+ | Wrist + Core Balance |
| King Dancer Pose | Natarajasana | ★★★☆☆ Intermediate+ | Balance + Flexibility |
| Side Plank Variation | Vasisthasana | ★★★☆☆ Intermediate+ | Arm + Core Strength |
| Camel Pose | Ustrasana | ★★☆☆☆ Intermediate | Front Body Opening |
| Wheel Pose | Urdhva Dhanurasana | ★★☆☆☆ Intermediate | Spinal Flexibility |
| Boat Pose | Navasana | ★★☆☆☆ Intermediate | Core Endurance |
| Warrior III | Virabhadrasana III | ★★☆☆☆ Intermediate | Balance + Hip Control |
| Standing Forward Fold | Uttanasana | ★☆☆☆☆ Challenging for many | Hamstring Flexibility |
Expert-Level Hard Yoga Poses (Attempt Only With Guidance)
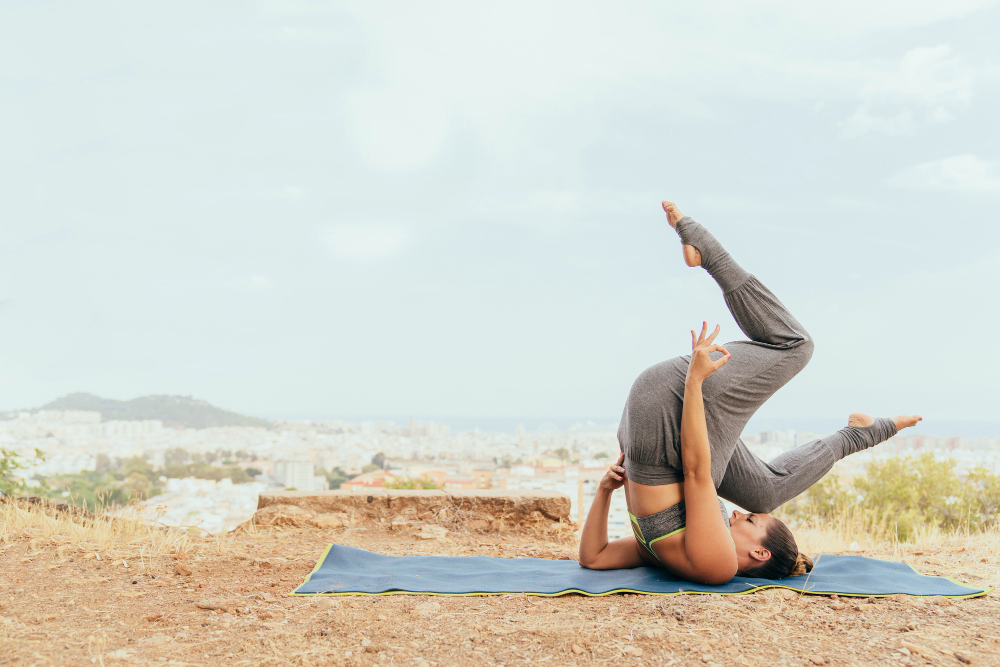
1. Scorpion Pose (Vrischikasana) — The Crown Jewel of Hard Yoga Poses
If there is one pose that yoga practitioners talk about with a mixture of reverence and slightly terrified respect, it’s Scorpion. This extraordinary inversion combines a full forearm balance with a deep backbend, bringing your feet toward (or touching) the back of your head — creating the curved shape of a scorpion’s tail.
What makes Scorpion one of the hardest yoga poses in the world isn’t just the flexibility or the strength — it’s the demand for both simultaneously, while inverted, while balancing on your forearms. It’s a full-body pose that requires years of consistent preparation.
What You Need First:
- Solid forearm balance (Pincha Mayurasana) — you should hold it confidently for 30+ seconds
- Deep, open backbend — Wheel Pose should feel comfortable, not forced
- Strong shoulder girdle and core stability
- A wall and a spotter until you’re very consistent
Step-by-Step Guide:
- Begin in Dolphin Pose (forearm plank with hips raised) to warm up your shoulders
- Walk your feet closer to your elbows, then press up into Pincha Mayurasana (forearm balance) against a wall
- Once balanced, slowly begin to bend your knees and drop your feet toward your head
- Keep your gaze forward — don’t crane your neck backward
- Breathe steadily. Maintain engagement through your core to protect your lower back
- Hold for 5-10 breaths before slowly lowering out
Beginner Modification: Practice Pincha Mayurasana (forearm stand) at the wall daily. Add baby backbend drops only when your forearm stand is rock solid. Don’t rush this one — Scorpion typically takes 2-5 years of dedicated practice.
2. Eight-Angle Pose (Astavakrasana) — The Ultimate Arm Balance
Eight-Angle Pose looks like something from a gymnastics floor routine — and truthfully, the strength it requires isn’t far off. Named after the sage Astavakra (who had eight crooks in his body), this arm balance requires you to thread your legs through your arms, hook them around one arm, and extend your body parallel to the floor.
What makes this one of the most difficult yoga poses is the combination of deep hip flexibility to get into position and serious arm and core strength to hold it. Many practitioners find one element easier than the other — the key is developing both together.
What You Need First:
- Strong arm strength — Chaturanga Dandasana should feel effortless
- Open hips — you should be comfortable in wide-legged seated positions
- Ability to lift your hips off the floor in Firefly pose prep
Step-by-Step Guide:
- Start seated with legs extended. Bend your right knee and bring it high up toward your right shoulder
- Hook your right arm under your right knee, placing the knee high on your right upper arm
- Plant both palms firmly on the floor, fingers spread wide
- Shift your weight into your hands and begin to lift your hips
- Cross your left ankle over your right, squeezing your legs together around your right arm
- Lean forward, extending your legs out to the right, parallel to the floor
- Hold for 3-5 breaths. Lower slowly and switch sides
Beginner Modification: Sit in a chair and practice threading the knee over the arm to get the hip-opening sensation without the full weight-bearing. Also work on Crow Pose daily to build the foundational arm strength needed.
Advanced Hard Yoga Poses (Suitable for Intermediate+ Practitioners)
3. Handstand (Adho Mukha Vrksasana) — The Most Sought-After Hard Yoga Pose
Ask any yoga practitioner what pose they most want to achieve and handstand comes up more than almost anything else. There’s something about being fully upside down, supported only by your hands, that represents a real milestone in any yoga journey.
The good news? Handstand is achievable for most people with dedicated practice — it just takes longer than most people expect. The bad news? Most people try to kick up and hope for the best, which is the slowest possible route to success.
What You Need First:
- Strong wrists and shoulders — practice wrist warm-ups daily
- Solid Downward Facing Dog with straight arms and open shoulders
- Core strength to hold a hollow body position
- Comfort being upside down — wall handstands first
Step-by-Step Guide:
- Start in Downward Dog, hands shoulder-width apart, 6-8 inches from a wall
- Walk your feet closer (L-shape position) — hold for 30 seconds to build shoulder strength
- From L-shape, practice kicking up one leg at a time against the wall
- When kicking up, think ‘reach’ not ‘kick’ — it’s controlled, not explosive
- Once at the wall, squeeze your legs together, point your toes, and hold a straight line from hands to heels
- Work on balance by lightly tapping your heels off the wall, finding your centre of gravity
Beginner Modification: L-shape handstand at the wall (feet on wall, body horizontal) is an excellent preparatory pose that builds the exact shoulder strength you need. Do this 3-4 times per week before attempting full handstand.
4. One-Legged King Pigeon Pose (Eka Pada Rajakapotasana) — The Deep Backbend
This is one of those hard yoga poses that looks deceptively simple in photos — until you actually try it. Eka Pada Rajakapotasana requires an extraordinary opening of the hip flexors, quadriceps, and entire front body, while simultaneously demanding a deep backbend that brings the foot toward the head.
Most practitioners can access a basic Pigeon Pose relatively quickly, but the full King Pigeon expression — where you grasp your back foot with your hands behind your head — can take years of consistent hip and back work.
Step-by-Step Guide:
- Begin in a low lunge with your right foot forward
- Lower your right knee to the mat and slide your foot toward the left side of your mat (classic Pigeon position)
- Lower your hips toward the mat, keeping your back leg extended directly behind you
- If accessible, begin to lift your back foot by bending your left knee
- Reach both arms back and try to grasp the back foot — use a strap around the foot if needed
- Gently draw the foot toward your head, opening the front body
Beginner Modification: Standard Pigeon Pose is a beautiful pose in itself. Focus on squaring your hips and staying there for 2-3 minutes per side. When that becomes comfortable, introduce the quad stretch by bending the back knee and reaching for it.
5. Peacock Pose (Mayurasana) — Arm Balance + Core Test
Peacock Pose is one of those hard yoga asanas that almost nobody attempts until they’re quite advanced — and for good reason. You balance your entire body horizontally on just your elbows, which are pressed into your abdomen. The pressure on the wrists and the demand on the core make this one of the toughest arm balances in yoga.
Step-by-Step Guide:
- Kneel and place your palms on the floor, fingers pointing toward your knees
- Bend your elbows and press them into your belly, just below your ribs
- Lean forward, shifting your weight onto your hands — your body should begin to rise
- Extend both legs behind you, squeezing them together
- Focus on a spot on the floor. Hold for 3-10 breaths
Beginner Modification: Practice Frog Pose (Mandukasana) to open your wrists in the reverse direction. Also build core strength with Plank and Chaturanga before attempting Mayurasana.
Intermediate Hard Yoga Poses (Your Next Steps)
6. Headstand (Sirsasana) — The King of Yoga Poses
Sirsasana is traditionally called the king of all yoga poses — and once you experience the full, balanced expression of it, you’ll understand why. The sense of stillness and inner calm that comes from a confident, relaxed headstand is unlike anything else in the practice.
It’s also one of the hard yoga poses that most intermediate practitioners can actually achieve with proper preparation, which makes it a wonderful goal for those somewhere between beginner and advanced.
Step-by-Step Guide:
- Begin in Child’s Pose. Interlace your fingers and place your forearms on the mat, elbows under your shoulders
- Place the crown of your head on the mat, cradled by your hands — NOT your forehead
- Tuck your toes and lift your hips, walking your feet toward your face
- When your hips are stacked over your shoulders, lift one leg and then the other
- Squeeze your legs together, engage your core, and breathe
- Keep your weight in your forearms — only about 10-20% should be in your head
Beginner Modification: Dolphin Pose (forearm plank with hips raised) is your best friend for building the shoulder strength headstand requires. Also practice at the wall — there’s no shame in using support while you build confidence.
7. Crow Pose (Bakasana) — The First Arm Balance
For many yogis, Crow Pose is the gateway to all other arm balances. It’s the pose where you first discover that yes, your arms can actually support your body weight. And that discovery is genuinely thrilling.
Crow looks terrifying before you try it — you’re squatting down, putting your knees on your upper arms, and leaning forward until your feet lift. Most beginners are convinced they’ll fall on their face. Some do — once. Then they learn to control it.
Step-by-Step Guide:
- Squat down with feet hip-width apart. Place your palms flat on the mat, shoulder-width apart
- Bend your elbows slightly to create a ‘shelf’ with your upper arms
- Place your knees on the backs of your upper arms, as high as possible
- Lean your weight forward into your hands — this is the key step most beginners skip
- Begin to shift weight until you feel your feet become light
- Lift one foot, then the other, squeezing your knees against your arms
Beginner Modification: Place a block or folded blanket under your feet — this gives you a head start on the forward lean. You can also place a pillow in front of your face so fear of falling forward doesn’t stop you from committing to the lean.
8. Firefly Pose (Tittibhasana) — Hamstrings Meet Arm Strength
Firefly Pose is one of those hard yoga poses that looks almost impossible the first time you see it — your body extended horizontally between your arms, legs straight out to the sides, hovering above the ground. It demands open hamstrings AND strong arms at the same time, which is a rare combination to develop.
Many practitioners find one element easy but the other frustratingly tight. Strong gym-goers often have the arm strength but locked hamstrings. Flexible yogis get into position easily but can’t hold themselves up. Both elements must come together.
What You Need First:
- Hamstrings open enough that you can place your shoulders behind your knees in a squat
- Arm strength from consistent Crow Pose and Chaturanga practice
- Wrist stability — prep with wrist circles and planks
Step-by-Step Guide:
- Stand with feet wider than shoulder-width. Fold forward deeply, bringing your torso between your legs
- Bend your knees enough to thread each shoulder behind each knee
- Plant your palms flat on the floor, fingers spread wide
- Bend your elbows slightly and lean your weight into your hands
- One foot at a time, begin to shift your weight forward until your feet lift
- Try to straighten your legs and extend them forward. Hold 3-5 breaths
Beginner Modification: Work on deep hamstring opening with Prasarita Padottanasana (Wide-Legged Forward Fold) daily. In parallel, build arm strength with Crow Pose. You don’t need perfect flexibility in either area — just enough of both to meet in the middle.
9. King Dancer Pose (Natarajasana) — Balance Meets Beauty
Natarajasana is one of the most photographed hard yoga poses — and for good reason. When executed fully, it’s genuinely breathtaking: standing on one leg, torso forward, the other leg arching up behind in a deep backbend, arms reaching overhead to grasp the raised foot.
What makes this a difficult yoga pose is the triple challenge: you need hip flexor and quad flexibility to get the back leg high, shoulder flexibility to reach back and hold it, AND single-leg balance strong enough to hold it all together while breathing calmly.
Step-by-Step Guide:
- Stand in Tadasana (Mountain Pose). Shift your weight onto your right foot
- Bend your left knee and reach back with your left hand to grasp the inner arch of your left foot
- Begin to kick your left foot back and up into your hand, while simultaneously hinging your torso slightly forward
- Reach your right arm forward and up for counterbalance
- As flexibility increases, bring your right arm back overhead to grasp the foot with both hands
- Keep your standing leg strong and your gaze fixed on a steady point in front of you
Beginner Modification: Use a strap around your back foot if you cannot reach it comfortably. Loop the strap and hold the other end — this gives you all the same opening benefits without needing extreme shoulder flexibility. Practice against a wall for balance support while you build confidence.
10. Side Plank Variation (Vasisthasana) — Core and Shoulder Endurance
Side Plank in its basic form is accessible to many intermediate practitioners, but its advanced variation — where the top leg is lifted straight up, held by the top hand — transforms it into a genuinely hard yoga pose. The combination of lateral core endurance, hip flexibility, and shoulder stability required is substantial.
This is also one of the most functional difficult yoga poses — the strength it builds directly transfers to all your other challenging postures.
Step-by-Step Guide:
- Begin in a high plank. Rotate onto your right hand and right foot, stacking your left foot on top of your right
- Lift your left arm straight up toward the ceiling — basic Side Plank
- For the advanced variation: bend your left knee, reach up and grasp your left big toe
- Slowly straighten your left leg toward the ceiling, opening your hip
- Stack your hips and keep both legs straight and strong
- Hold 5-8 breaths and switch sides
Beginner Modification: Master standard Side Plank (feet stacked or staggered) before attempting the leg lift. Build up your hold time to 30 seconds on each side first. Then introduce the knee bend before attempting the full leg extension.
Intermediate Hard Yoga Poses — Achievable With Consistent Practice
11. Camel Pose (Ustrasana) — The Front Body Opener
Camel Pose surprises many people. It doesn’t look extreme compared to some of the poses above, but for many practitioners — especially those who sit at desks all day — Ustrasana produces an intense and sometimes overwhelming sensation of opening through the chest, throat, and hip flexors.
It’s a hard yoga pose not because it requires acrobatic skill, but because most modern bodies are so chronically tight through the front body that this full expression of extension feels genuinely challenging and sometimes emotionally powerful.
Step-by-Step Guide:
- Kneel with knees hip-width apart. Press the tops of your feet into the mat
- Place your hands on your lower back, fingers pointing down, and begin to open your chest upward
- If accessible, reach back one hand at a time to grasp each heel
- Push your hips forward so they stay over your knees — don’t sit back
- Let your head drop back only if your neck is comfortable with it
- Hold 5-8 breaths. Come up slowly — sit in Child’s Pose immediately after to counter the backbend
Beginner Modification: Tuck your toes so your heels are higher — this makes them much easier to reach. Keep your hands on your lower back and simply open your chest without reaching back at all. This gentler version is still a powerful heart opener.
12. Wheel Pose (Urdhva Dhanurasana) — The Full Backbend
Wheel Pose is the classic full backbend of yoga — both hands and both feet on the ground, hips and chest lifted high, spine in a deep arch. It looks dramatic and feels even more so the first few times.
What makes this a hard yoga pose for many people is that it simultaneously requires open shoulders, open hip flexors, flexible spine, AND strong arms and legs to push up and hold the position. Any one of those missing and the pose collapses.
Step-by-Step Guide:
- Lie on your back. Bend your knees and plant your feet hip-width apart, close to your hips
- Bend your elbows and place your palms beside your ears, fingers pointing toward your shoulders
- Press firmly through your feet and hands, lifting your hips. Rest briefly on the crown of your head
- Straighten your arms fully, lifting your head off the ground
- Work to straighten your legs and push your chest toward the wall behind you
- Hold 5-10 breaths. Lower slowly, tucking your chin first
Beginner Modification: Bridge Pose (Setu Bandhasana) is your foundation. When Bridge feels easy and comfortable, begin working on Wheel. You can also use a wall — stand facing away from the wall and walk your hands down it into a partial backbend before attempting the floor version.
13. Boat Pose (Navasana) — The Core Endurance Test
Boat Pose might seem out of place among these harder postures — but hold it properly for 60 seconds and you’ll understand immediately why it belongs on this list. True Navasana with straight legs, straight spine, and arms parallel to the floor is one of the most demanding core poses in the entire yoga canon.
Most practitioners either round their back to keep their legs up, or lower their legs to keep their back straight. The hard yoga pose version requires both simultaneously — and that’s genuinely difficult.
Step-by-Step Guide:
- Sit with knees bent, feet flat on the floor. Hold the backs of your thighs
- Lean back slightly until you feel your core engage — keep your spine long, not rounded
- Lift your feet until your shins are parallel to the floor (easier variation)
- For full Navasana, straighten your legs to a 45-degree angle
- Release your hands and extend your arms forward, parallel to the floor
- Hold 30-60 seconds. Breathe steadily. Repeat 3-5 times
Beginner Modification: Keep your knees bent (Half Boat) and hold the backs of your thighs for support. Focus entirely on keeping your spine straight — a straight-spined Half Boat is far more beneficial than a rounded Full Boat.
14. Warrior III (Virabhadrasana III) — Balance and Hip Precision
Warrior III is deceptively difficult. It appears straightforward — stand on one leg, tip your body forward, extend the other leg back. But achieving a truly level pelvis, straight back leg, engaged core, and strong standing leg all at once while staying calm and breathing? That requires real body awareness and practice.
This is one of those hard yoga poses where most people think they’re doing it correctly until they see a photo or video of themselves. The back hip almost always wants to hike up, the standing knee wants to soften, and the spine wants to round.
Step-by-Step Guide:
- Stand in Tadasana. Shift your weight onto your right foot
- Hinge forward from your hips — NOT rounding your back — as your left leg lifts behind you
- Your body should form a straight T-shape: torso parallel to the floor, back leg parallel to the floor
- Square both hips toward the floor — the biggest challenge of this pose
- Extend your arms forward, alongside your ears, or place hands on your hips
- Hold 5-8 breaths. Step forward to stand and switch sides
Beginner Modification: Use a wall for your extended back foot — press your back foot lightly against the wall for stability as you work on levelling your hips. Blocks under your hands also help when balance is still developing. Focus entirely on hip alignment before worrying about arm position.
15. Standing Forward Fold (Uttanasana) — Hard for Most Bodies
Yes, a forward fold is on this list — and here’s why: a true, full Uttanasana with completely straight legs, chest resting on thighs, and palms flat on the floor is something the majority of the global population simply cannot do without years of consistent hamstring and lower back opening.
We include it here because people often underestimate how much work this fundamental pose actually requires, and how rewarding the full expression genuinely is. If you can rest your chest on your thighs with straight legs, you have exceptional hamstring flexibility — something most people never develop.
Step-by-Step Guide:
- Stand in Tadasana. Take a slight bend in your knees to start
- Hinge from your hips — not your waist — folding your torso over your legs
- Let your head hang heavy. Hold your elbows or let your hands rest wherever they reach
- On each exhale, gently deepen the fold — never force it
- Slowly begin to straighten your legs only as far as you can WITHOUT rounding your lower back
- Work toward placing your palms flat on the floor beside your feet
Beginner Modification: Always bend your knees generously and focus on the hip hinge rather than reaching for the floor. Blocks under your hands are essential for many practitioners. The goal is a flat back folding over straight legs — that journey alone can take 1-2 years for tight individuals.
Common Mistakes People Make With Hard Yoga Poses
Over the years, certain patterns come up again and again when people attempt difficult yoga poses. Here are the biggest ones to avoid:
- Skipping the Foundation Work: The most common mistake, by far. Everyone wants to jump to the ‘exciting’ poses without putting in the preparatory work. Hard yoga poses are only hard because of missing foundations — if you build those foundations properly, the poses become much more accessible.
- Practicing When Fatigued: Arm balances and inversions require fresh muscles and a sharp mind. Attempting hard yoga asanas at the end of a sweaty class when you’re already tired is a recipe for injury. Practice your challenging poses early in your session when you’re warm but not exhausted.
- Holding Your Breath: This one sounds obvious, but the moment something gets hard, most people hold their breath. In difficult yoga poses, breath is what keeps you connected and in control. If you can’t breathe in a pose, you’re not ready for it yet.
- Comparing Your Progress to Others: Social media is full of people doing extraordinary hard yoga poses. Those images don’t show the 3 years of daily practice, the 200 failed attempts, or the pulled muscle that happened along the way. Your practice is your own.
- Ego Adjustments: Yanking yourself deeper into a pose to match what you think it ‘should’ look like causes more yoga injuries than anything else. Respect your body’s current range of motion. Yoga is a lifelong practice — you have time.
Expert Tips to Progress Faster in Difficult Yoga Poses
- Consistency over intensity — 20 minutes daily beats 2 hours on weekends every single time
- Use props without shame — blocks, straps, and walls are tools, not crutches
- Video yourself occasionally — what you think your body is doing and what it’s actually doing are often very different
- Work on your weakest link — flexibility people need strength training; strong people need more mobility work
- Rest and recovery matter — your body adapts during rest, not during practice
- Find a qualified teacher — especially for inversions and deep backbends, in-person guidance prevents injury
- Journal your practice — noting small improvements keeps motivation high when progress feels slow
Conclusion
Hard yoga poses exist on a spectrum — from the satisfying challenge of Crow Pose to the extraordinary achievement of Scorpion. What they all have in common is that they reward patience, consistency, and respect for the process far more than they reward raw talent or ambition.
The yogis who achieve these poses aren’t typically the most naturally flexible or the strongest. They’re the ones who show up regularly, work their foundations, use props without embarrassment, and keep going when progress feels invisible.
Pick one pose from this list that genuinely excites you. Study its prerequisites. Start working those preparatory poses this week. And remember — every advanced yoga practitioner you’ve ever admired was once a complete beginner who had no idea how to do any of this.
The path is the point. Enjoy it.
Frequently Asked Questions About Hard Yoga Poses
Q: What is the hardest yoga pose in the world?
A: Most yoga experts consider Scorpion Pose (Vrischikasana) or its variation Handstand Scorpion to be among the hardest yoga poses in the world. They combine extreme backbending flexibility with full inversion balance and require years of dedicated preparation. Other contenders include One-Legged King Pigeon and Eight-Angle Pose.
Q: Can beginners try hard yoga poses?
A: Beginners should not attempt advanced hard yoga poses without proper foundation. However, every challenging pose has a simpler preparatory version that beginners CAN work on. For example, Crow Pose has a seated preparation, Headstand can be prepped with Dolphin Pose, and Scorpion begins with simple forearm balances. Build the foundation first and the advanced poses will come.
Q: How long does it take to learn difficult yoga poses?
A: It depends entirely on the pose and your starting point. Something like Crow Pose might take 4-8 weeks for a reasonably fit beginner. Headstand might take 3-6 months. A full Handstand typically takes 1-2 years of consistent training. Expert poses like Scorpion can take 3-7 years. Consistent daily practice dramatically speeds this up.
Q: Are hard yoga poses safe?
A: Hard yoga poses are safe when approached correctly — meaning proper warm-up, appropriate progressions, and no forcing or ego. Injuries happen when people attempt poses they’re not physically prepared for, or when they push into pain. Always work with a qualified yoga teacher when attempting inversions and advanced backbends for the first time.
Q: What should I practice every day to get better at hard yoga poses?
A: The most universally useful daily practices for advancing toward hard yoga poses are: wrist and shoulder mobility exercises (5-10 minutes), core strengthening (Plank, Hollow Body, Boat Pose), hip opening (low lunges, pigeon prep), and consistent work on your specific preparatory poses. Daily practice of even 15-20 minutes produces faster results than longer occasional sessions.
Q: What are the most impressive-looking hard yoga poses?
A: From an aesthetic standpoint, poses like Scorpion (Vrischikasana), Handstand (Adho Mukha Vrksasana), Eight-Angle Pose (Astavakrasana), and One-Legged King Pigeon (Eka Pada Rajakapotasana) are considered among the most visually striking difficult yoga poses. But remember — impressiveness to others is rarely a good reason to attempt a pose you’re not ready for.

